I discovered crafting paper beads on YouTube and enjoyed it immensely when I tried it. There are a great variety of paper bead sizes and shapes, however, so far, I have stuck with two – ½” oval and ¼” round. Most of my beads are the ½” oval because I like how those rolled beads look with the thicker cardstock I usually buy for the project. The ¼” round bead came about from an unexpected pivot I chose to make while using a much thinner type of paper (pages from a thrifted Dr. Seuss book). I prefer the look of the ¼” smaller round bead when rolling paper thinner than cardstock.
Supplies
The supplies you’ll need for this project include:
- Paper – Any size and most thicknesses will work for this project, but keep in mind that both will affect the appearance of your final bead. For example, thinner paper will give you a thinner bead, while thicker paper will give you a thicker bead. The pattern of your paper will also affect the look of your final bead. For this reason, I’ve found it’s better to choose paper with a single solid color, ombre colors, 2-3 solid stripes, or repeating patterns with highly contrasting colors, such as pinks on greens or blues.
- Pencil
- Ruler or cutting mat
- Paper slicer/cutter – You can find these in craft stores and on Amazon. I would caution against a guillotine for this project as the cuts won’t be as accurate.
- Paper roller – You can find these on Amazon alone or as part of a kit. If you’re a DIY-er, you can find YouTube tutorials that will explain how you can make your own with a few simple supplies. You can also use a wooden skewer or coffee straw.
- PVA school glue
- Gloves
- Judikins Diamond Glaze – There are different products you can use to seal your beads, but, for the purposes of these instructions, this is the sealer I will use. Craft stores and Amazon carry this.
- Small disposable plate or bowl
- Small acrylic paintbrush
- Toothpicks
- Foam block – You can find these in craft stores. Leave the plastic wrap on it to extend its life.
Cutting the Paper
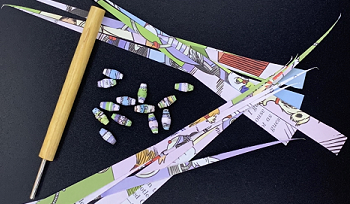
After purchasing your paper of choice, you’ll need to prepare it for rolling. This means cutting the paper into long triangles.
- Decide what shape you want your final bead to be. The shorter you make the large end, the narrower the final bead will be.
- Use the ruler or marked cutting mat and the pencil to mark ½” (for example) segments along the top and bottom of the paper.
- Open the cutting arm of the paper slicer/cutter, and line up the pencil mark with the cutting groove in the paper slicer/cutter on one side and the closest edge of the paper on the other side to form a triangle along the cutting groove.
- With the blade at the top or bottom of the cutting arm, close the arm on the paper, press down on the blade piece, then slide it down the length of the paper.
- Open the blade arm, then remove the paper triangle and set it aside.
- Shift the paper so that the wide end and the point of the next triangle are on opposite sides (compared to the previous triangle) along the paper slicer/cutter’s groove.
- Close the blade arm, press down on the blade piece, then slice down the length of the paper.
- Open the blade arm, then remove the paper triangle and set it aside.
- Continue steps 3 through 8 until the entire sheet of paper is cut into triangles.
| TIP: When I first started this process, I would lose track of which end was previously the long end and which was the tip as I was adjusting the paper between triangles. To prevent losing track, I now keep the blade cutter at the wider end of the triangle and cut from wide end to tip every time. |
Rolling the Paper
The next part of the paper bead making process is to roll the triangles into bead shapes.
- Slide the wide end of one of the triangles into the slit of the paper roller.
- Use the fingers from your hand that isn’t holding the roller to keep the paper triangle secure and in place as you roll it with the other hand.
- Twist the bead roller toward the wrong side of the paper, in other words, toward the side of the paper you don’t want to show.
- Keep rolling the triangle paper until there is about ½” remaining until the tip.
- Adjust your fingers so that you’re holding onto the bead roller and the bead with fingers from one hand.
- With your free hand, add a long, thin drop of glue to the inside of the remaining, unrolled paper triangle. Be sure to use the least amount of glue possible as the sealer won’t stick to any exposed, dry school glue, which will result in an uneven finish on the final bead.
- Readjust the roller and the bead with two hands, as before, and finish rolling the bead with the glued bit pressed against the bead.
- Hold the glued end of the bead against the bead for several seconds to make sure it is well secured.
- Slide the bead off the bead roller onto a nonstick surface to finish drying.
Sealing the Paper Bead
When the school glue on the rolled bead is dry, you can seal your beads. I typically leave my beads to dry at least overnight before sealing them. The Internet says school glue will set in an hour and be fully dry in 24 hours.
- Have your foam block in front of you and the toothpicks and beads within reach.
- Pour a small amount (about the size of a nickel or quarter) of the Judikins Diamond Glaze into your disposable plate/bowl. If you pour too much, it’s liable to start drying while you’re working and be wasted. You can always add more as you need it.
- Grab a toothpick and put a bead on it.
- Dip your small paintbrush into the Judikins Diamond Glaze, then paint a thin coat around your entire bead. Be careful not to paint the glaze on the toothpick as this can permanently adhere the toothpick to the bead, which you don’t want.
- When the bead is fully covered, stick the toothpick into the foam block and leave to dry for 2-3 hours, depending on the thickness of your glaze. Remember to keep your glaze layers thin.
- Repeat steps 3 through 5 with the remaining beads.
- When the beads are fully dry, repeat steps 3 through 6 twice more.
At the end of this process, your beads will have 3 layers of Judikins Diamond Glaze and will look and feel like they are made with glass. Congratulations! Your beads are complete and ready for jewelry making, selling, or giving as gifts.